Showing posts with label DIY. Show all posts

Wednesday, January 30, 2013

Unforgettable Valentines

while we're waiting to hear back about a potential home in FL,
(and to keep myself from going crazy with anxiety)
B and I decided to have a little CRAFT DAY to make some super cool Valentines for family...

 i popped onto Pinterest for some ideas, only to spot this super-adorable guy.


 it was toddler-friendly, and looked easy enough...
so i went around gathering supplies.
as soon as i brought out the "google-eyes," B was game... 
sister loves her some google-eyes!

 it turns out that i had already packed up the construction paper,
 so i had to bust open a box to retrieve it...
 it was well worth it, though. ;)
of course, B wasn't much into the whole tracing part...
or the cutting part...
but when the glue and google-eyes came out, she was ready to participate!

and we did have to take a small break to dance during key songs on Cinderella...
these days, it is not uncommon to see B randomly dancing or singing...

as i said before... at this stage, B just isn't really into the "preparation" aspect of our crafts...
but my glue-lovin' gal is always ready to get sticky!
 
 and she loves to help "blow" on the glue to help it dry... very essential. ;)


we made a few purple and a few pink... 
and as soon as they dry, they will be ready to send out to all of B's special valentines!

i hope you all are enjoying your preparations 
for Valentine's Day!

Tuesday, November 27, 2012

DIY | Reindeer Thumbprint Ornaments

we have been a little stressed around our house lately,
so i decided that decorating for Christmas was exactly what we needed...
and decorate we did!

... but you know we can't decorate without a little DIY-action!

this one was quick, easy, and cost about $5 - $10.
the only cost was purchasing a set of clear glass ornaments
from the lovely Christmas wonderland of Target.


 what you'll need:
acrylic paints in your choice shades of brown and red
a black (or brown) sharpie
small paintbrush
artificial snow (or glitter, or even sand)
a thumb (either yours or your kiddos')
a place to hang ornaments to dry

to start, i just squirted some of the tan paint onto a piece of parchment paper, 
smeared my thumb in it - noting not to accumulate too much - 
then, i centered the ornament in my hand and placed 4 thumbprints evenly around it.
i hung it on an ornament stand to dry.
after it was completely dry,
i took a black Sharpie marker and added a pair of eyes and antlers to each thumbprint.

 i squirted a little red paint on my parchment paper,
and took the tip of the small paintbrush to add a red nose. :)

after drying, i added some artificial snow inside the ornament.
and voila, your very own reindeer ornament!
 i made about 7 of these as Christmas gifts for grandparents and godparents this year. :)

and, yes, i had planned to involve B in this craft, 
 but she wanted nothing to do with sticking her thumb in paint.
 those TERRIFIC TWOS are in full-force around here lately, so we take what we can get... ;)
but if you can get lucky, this would be a wonderful craft to involve the kiddos...

happy crafting!


Tuesday, October 9, 2012

B's Toddler Room and a Little DIY

after the birthday bash, i finally found myself with a little more time on my hands- 
enough to finish a few projects that have been in the queue for a while now...
one of those being Brynn's toddler room.


i've had my eye on a bedding collection for B at RH BABY&CHILD for some time now... 
and since she has become very cozy in her new toddler setting, 
i took full advantage of the friends & family savings this past weekend, and purchased it!

of course, even with the discount...
it just wasn't really worth spending $59 
on this amazing ballerina appliqued pillow cover.
 
|via rh baby&child|              
 
therefore, i decided a little DIY was in order...

i knew i had pink tulle and some white burlap laying around the house somewhere.
so, i was on the search for a french-script pillow cover, which I found |HERE|
 of course, a little light went off in my head when i realized
that i could make TWO  for less than it cost to buy the original!!

i used a hand-made paper template to cut out the bodice,
then i used fabric glue and hot glue to secure all of the fabric pieces to the pillow cover.
(sorry, i don't sew)


the room is still a work-in-progress,
mostly because we know that we will be moving in the next 6 months...
but here is B's toddler room so far.


b's view from her window.


we've been in this "temporary" living situation for a year and a half now...
staying in this amazing 100 year-old house, which holds a lot of character,
a lot of memories, and can also be a lot of work to maintain.

at one point, we thought we were going to make it permanent,
 but we have done enough research to realize that renovation just isn't an option.
it breaks my heart to know that the facts are pretty hopeless...
i can't help but feel like i'm letting my grandparents down,
but- the fact is- we won't be able to save this house.

for now, we are just enjoying the time... 
and the memories that we are making while we are here.

Tuesday, May 29, 2012

The Clean Challenge

Have you seen those Pins floating around Pinterest about making your own laundry and dishwasher detergents with simple, nontoxic ingredients? Me too! I've never really bothered to explore them because I always thought, "Wow, that seems like a big waste of time," being that I have always been partial to my "clean" smelling scents of laundry, and the ease of adding a tablet to your dishwasher.

If it's not broke, why fix it?

Of course, Allen and I have been leaning to the "green" side for some time... And when I say "leaning," I  mean just that. We always attempt to weigh the benefits when we come across a decision to be more eco-friendly or organic, but neither one of us want to seem too granola-esque.
We just want to do what we feel is best for our family.

Honestly, it all began for me when we decided to start a family.
I could swear that Allen was born with this frame-of-mind...

At the time, I worked in a PICU- full of children born with life-altering congenital defects- and Allen was {and still is} "Captain Planet"-- which is what I always called him when he called me out for throwing a soda can/plastic bottle/{insert recyclable item here} into the trash can.

When these two people decide to procreate... You get panic.

I started paying attention to everything that my body came into contact with! Literally everything.
I remember attempting to hold my breath around the nitric oxide tanks that I used at work, not to mention the aerosolized antibiotics I used to treat patients...
And what I didn't think of... Allen did.
So, we switched to organic produce, Method soaps, etc, etc, etc.
 Yes, this was all before we even started TTC.
About a month later, we were expecting!
... and little B started her journey into a house of anti-granola Granolas. Ha!

We started using Seventh Generation diapers {and still do}, I continued to eat mostly organic while I was nursing her, and when we switched to formula, we went with Earth's Best. 
As time went by, it was just assumed that she would eat organic solids...
{for moms starting solids-- I always used Momtastic's Wholesome Baby Food website for recipe ideas}
And now, here we are.
Maybe a little crazy... But at least that gives us a little peace of mind?

That's just a little bit of the background that has finally thrown us in the mix of making our own detergents...  I will attribute this decision to the documentary Chemerical- which my very own Captain Planet convinced me to watch the other night. I guess it was the final push we needed.
Hmmmmmm. Of course, I'm always the skeptical one...
So, you can switch to toxin-free cleaners and save money... Really?!
Well, whether or not you believe half of what the documentary claims, I thought it was worth a try...

After an hour or so of online research, I came up with the following recipes to potentially replace the household cleaners that we currently use... Not to mention, I discovered there are a ton of people that already do this!
Much to my surprise, not only are these detergents composed of the most simple ingredients, they are also so inexpensive, it is fairly ridiculous to compare it to what we already paid for the Method laundry supplies and dishwasher tabs-- which we pay $$$ for because it's toxic-free!
 That was enough motivation for this momma...
So, I had to share with all of you! 

Here are the "recipes" that I decided to go with after a little research:
{Disclaimer: None of the below is reflective on Method soap being unreliable in any way... Nor is it comparing these two very different detergents. It is simply to show what we were using and what we are using now. The only reason for our decision to switch is solely financially related. IF we were to buy a product, it would be a Method product. I have never been anything but happy with ALL of their products.} 

 Recipe as follows, via Yellow Brick Home:

1-cup Borax
1-cup Arm&Hammer Super Washing Soda
1 bar of Fels-Naptha soap, finely grated

 Use 1 tablespoon per load.
 
All of these ingredients you can find in the aisles of your local Supermarket or Superstore!
The kicker? A bar of Fels-Naptha is like $1.
The other kicker?! 
This batch will last you 40+ loads, and both boxes contain enough to make almost 5 batches!
This comes out to be about 4-cents per load!  'Nuff said.

Oh, and we just upgraded to a high-efficiency washing machine, and multiple resources claimed this detergent is just as good, if not better, than other high-efficiency detergents...
A. It's much cheaper.
B. It's toxin-free!
C. It doesn't create "suds"

Recipes as follows, via Simply Designing
 {I love how she cut vinyl to put the recipe on the back of her container too!}
2-cups Borax
2-cups Arm&Hammer Super Washing Soda
1-cup Lemi Shine {due to lack of ingredient}
1-cup Citric Acid
1-cup Kosher Salt  
{I've seen other variations with sea salt and Epsom salt as well}
 Mix all ingredients into a container 
{we found these great glass air-tight containers at Wal-Mart for very cheap}

Use 1 tablespoon per load

You may also wish to use distilled white vinegar as a rinse aid if you have extra-hard water like we do!
Add 3 drops of dish soap per load for greasy dishes.

Multi-Surface Cleaner recipe, via New Nostalgia

1-cup distilled white vinegar
2-cups water
1/2 teaspoon dish soap {I absolutely love Seventh Gen's Lavender Floral Mint}
15 drops essential oils of your choice

Mix and store in spray bottle.
This can be used for glass and counter tops, etc.

**********************************************

Shower Cleaner recipe, via Life, Crafts & Whatever

1-cup distilled white vinegar, heated on stove {do not boil}
[about] 1-cup of dish soap

{she uses Dawn, but I used Seventh Gen's Lavender Floral Mint and it seemed to do the trick-- our shower has NEVER looked so good!}

Spray warm mixture onto shower/bath and let sit for 45 minutes to 1 hour {but you can wait a little longer if you like}, and then just spray it off with our portable shower head, or wipe it clean with a sponge or rag.
Our results were nothing short of amazing!

 Being that I was on a roll with my Pinterest "recipe" finds, I decided to make my own bath and shower scrub too that I had Pinned some time ago...

 I usually use Nature's Gate products in the shower, but they don't make a scrub...
My latest and greatest find is New Harmony Soap company's Rosemary Mint face bar!! I have tried everything for my problematic skin, and this does the trick in one step... :)  
BONUS: The company is located a block from our house!

Here is the recipe for the scrub, via deliciously organized
{which I tweaked a little}

3/4-cup Sea Salt
1/2-cup Organic Raw Sugar
1-cup room temperature Coconut Oil {liquify to add to scrub container}
40+ drops of lavender essential oils

 Most of the time, I don't even have to use lotion after my shower... Not that I usually have the time or energy to apply lotion, but it does wonders for dry skin!

If lavender isn't your thing, you can try these scrubs...

If you would like to explore a few other options to switch to toxic-free cleaners, check out this post by Keeper of the Home.

happy mixing!

Thursday, May 17, 2012

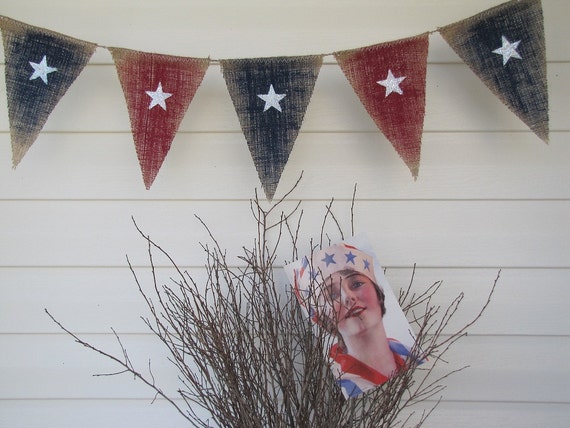
{Love}ly Banner

So, I'm pretty much obsessed with the Etsy shop, funky shiQue

I love burlap, I love holidays, and I love banners...
They have something for everyone! And the wedding stuff is TO DIE FOR!

I've been trying to find a few more decorative ideas for our gallery wall in the hallway, and I thought this banner would add some color, and go perfectly there!
While it pains me that I can't snatch this up right now, because we are trying to save some $moolah$ for our future home... I realized that I have some white burlap from a previous project, some red paint, and some twine.

HEEELLLLLOOOOOOOO!

Don't you just love when that light bulb goes off?

Obviously, I decided to make my own version... for free.
{Allen likes that word... a lot. Except when it comes before "shipping"-- Ha ha!}

I took advantage of nap time, and busted open the craft cabinet for the first time in... well, awhile.

 I finished all of the pennants during B's nap, but I didn't get to hang it until this evening...


And though it isn't exactly like my "dream" banner, it will do... For now ;)


But that won't stop me from eyeing this beauty for July ;)


Linking to:

Wednesday, March 28, 2012

Pinspired Easter Decor

I have been super-duper busy lately with all of my projects, so I haven't had much time to blog... Plus, I've been getting B ready for her first real Easter experience. Last year, she was still too small to hunt eggs or take a real interest in her Easter basket, etc... So, I'm very excited for her to experience all of that!

I'm also excited to purchase {or possibly DIY} some Resurrection Eggs for future years, like these...
                                                                      Source: motherhoodonadime.com via Emily on Pinterest

Unfortunately, I think she's still a little too young to do very much with them this year.

 This was my Pinspiration wreath for Spring/Easter this year!

                                                                           Source: lovelycraftyhome.com via Emily on Pinterest


Links to the tutorial can be found HERE and HERE if you would like to check it out...

I decided to make the colors a little more pastel-ish, and I also made our wreath a little smaller to better suit the front door.


I'm thinking of adding a few paper butterflies to give it a little more dimension :)

 I also was Pinspired to do some paper crafting, and I made some paper carrot boxes
{for the Easter bunny, of course}

                                                                      Source: creativetryals.blogspot.com via Emily on Pinterest


 Mine are smaller, and minus the stamping patterns... But I like how they fit into our Waterford bowl :) I may add a little something to them when I have more time.

{Link to the printable can also be found HERE.}

There are so many great decor ideas for Easter on Pinterest... It's hard to choose which to do next! I hope you all are enjoying your preparations as much as I am!

Linking to:

Monday, February 27, 2012

DIY Silhouette Art

Hi all!
After a very tough month, I'm back from a little blog sabbatical with a quick and easy project!

Make your own silhouette!


I love silhouette art... And had I known it was so easy to do it yourself, I would have completed this a long time ago! :) When I saw this idea on Pinterest, I went back through all of my photos to see if I could find one of B's profile. I found two or three potentials, then I cropped them, enlarged them {and rotated a few of them to get the perfect profile}, then printed them out onto white card stock. After I decided on the one I wanted to use, I cut it out, then traced the outline onto some black linen-finish card stock. I will tell you that I didn't really get the visualization on how it was going to turn out until after I traced it onto the black card stock... I was SO excited when I saw how well it transferred!
I cut it out from the black card stock, then used a couple of Zots to post it onto the white background.

Place it into a frame, and voila!
I remember my mom had all three of our silhouettes done when we were younger... I always loved looking at them, and now B has her own {apparently, for a fraction of the price that my mom paid to have ours done}! :)
I'm so excited to do another when she has a cute little ponytail!

Thursday, September 22, 2011

Pumpkin Baskets

Just finished my pumpkin baskets, and I'm linking up to a few craft parties today...
I have to say that these were by far the easiest and fastest project that I have taken on in awhile!! :) Of course, after the highchair, I think just about anything is easier and faster... But the window boxes have been pretty time-consuming too!

I started out with the two mum baskets from the large mums, which I re-potted.
I picked up some acrylic paints from Hobby Lobby in Harvest Orange and green, and then I started painting! :)


I used two coats of the orange because the baskets seemed to absorb a lot of the first coat...
Then I painted a little green to give them the "rustic pumpkin" look.


I used a Sharpie paint pen and printed off a face template to use as a stencil for the faces... However, it didn't work out very well, so I free-handed most of the face. I also decided that we didn't need two "face pumpkins," so I painted the "BOO" on the other one.
Then the hubby helped me cut some wood for the stems. I painted them brown (and distressed them a little), hot glued them on, then added a little twine... And voila! :)


Very inexpensive, and oh-so easy! :)
Happy pumpkin making!


A place called home